Getting Started
Welcome to the XD Soba API documentation! This guide will help you get started with our API, covering authentication, basic usage, and common patterns.
Introduction
The XD Soba API was developed to facilitate integration and programmatic access to the main services and data of the XD Soba application.
Through this API, it is possible to perform operations such as authentication, data querying, database access logging, and execution of other essential tasks, all securely and efficiently.
This guide is intended for any user or technical team that wants to configure and use the XD Soba API, presenting step by step the process of obtaining credentials, configuring access, and executing real requests on the platform.
Prerequisites
Before using the API, you must have an active XD Cloud account.
Creating an XD Cloud Account through XD Gestão Comercial
Follow the steps below to create your XD Cloud account:
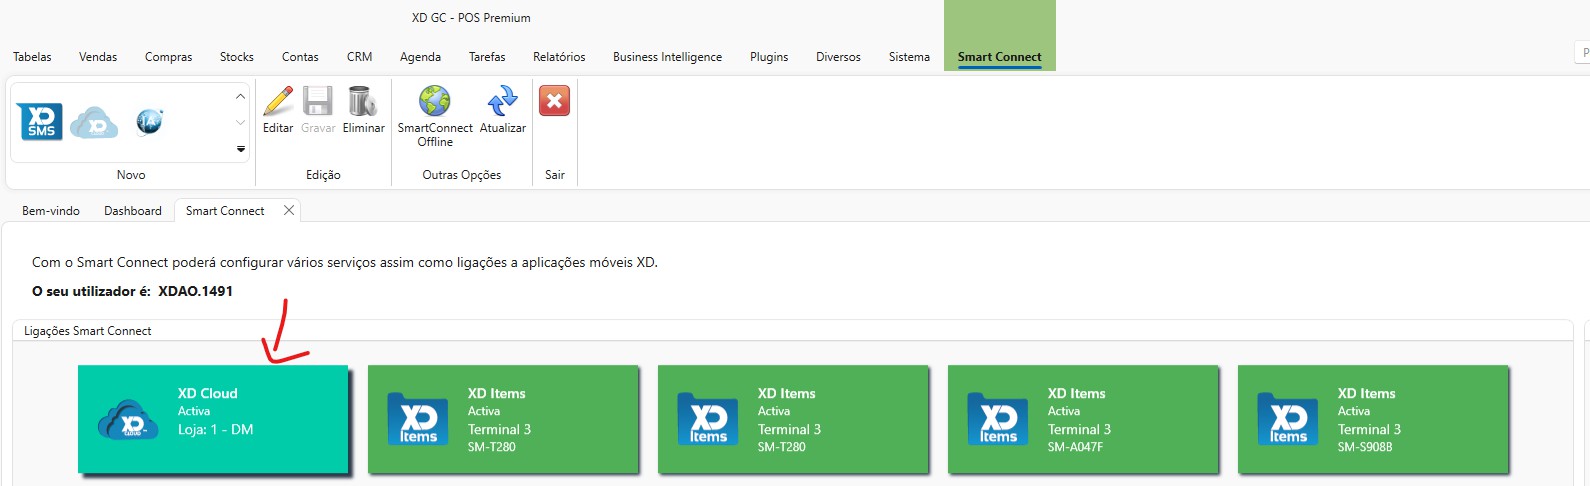
Step 1 – Access the Smart Connect Menu
Open the XD Gestão Comercial application, select the "Sistema" (System) tab, and click on the "Smart Connect" icon.

Step 2 – Start the Configuration of a New XD Cloud Account
In the Smart Connect tab, click the button corresponding to XD Cloud (cloud icon).

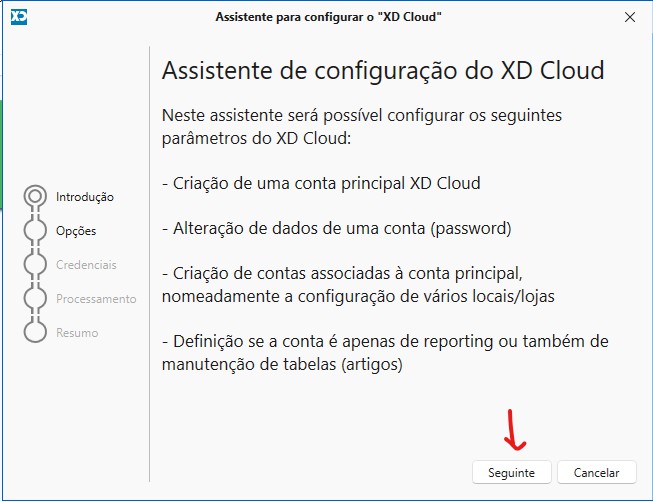
Step 3 – Start the Wizard
The Wizard to configure XD Cloud will open. Click "Seguinte" (Next) to proceed.
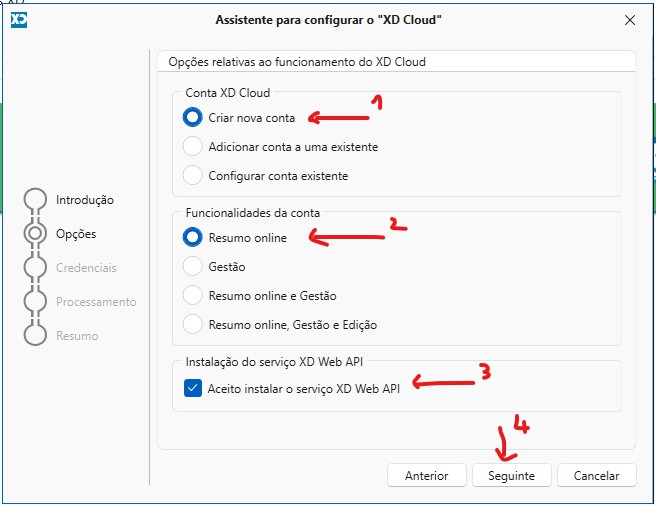
Step 4 – Define Account Options
- Select "Criar nova conta" (Create new account).
- Choose the desired feature (for example, "Resumo online" (Online summary)).
- Check the option "Aceito instalar o serviço XD Web API" (I agree to install the XD Web API service) (if applicable).
- Click "Seguinte" (Next).
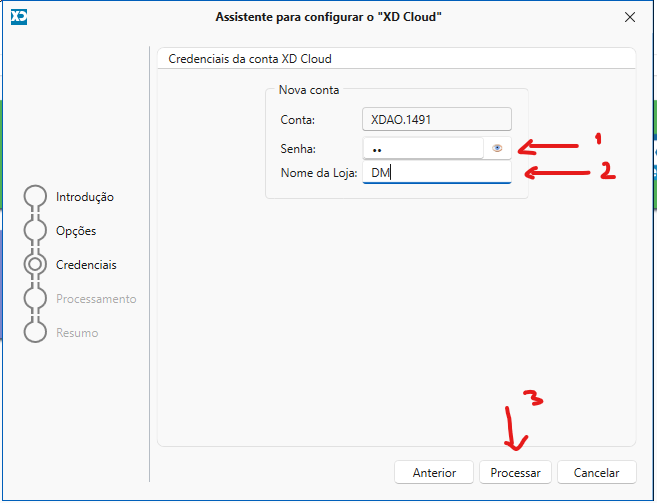
Step 5 – Enter Account Credentials
- Enter the account password.
- Indicate the store name.
- Click "Processar" (Process).
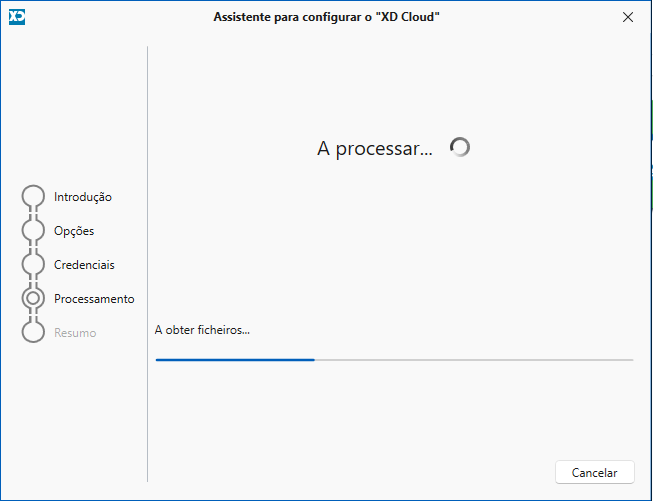
Step 6 – Configuration Processing
Wait while the system processes the configuration and installs the necessary services.
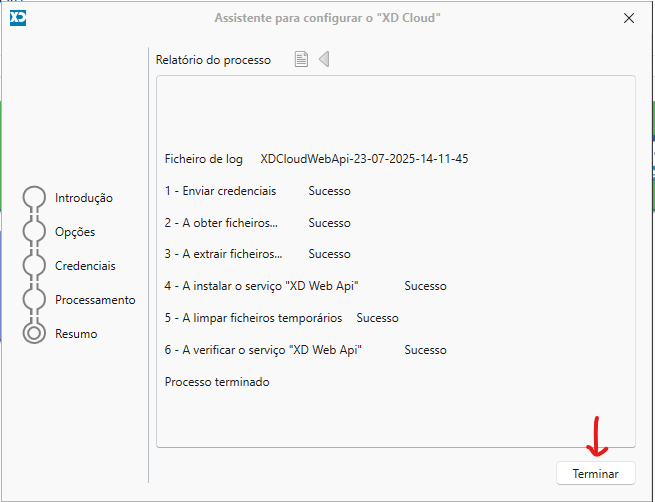
Step 7 – Process Completion
At the end, check the success report and click "Terminar" (Finish) to complete.
Step 8 – Active Account Confirmation
Return to the Smart Connect tab and confirm that the XD Cloud account appears as active.
Configure MySQL Connection in the XD Soba Frontend
Configure the MySQL database connection through the registration form in the XD Soba frontend.
Configuration Flow:
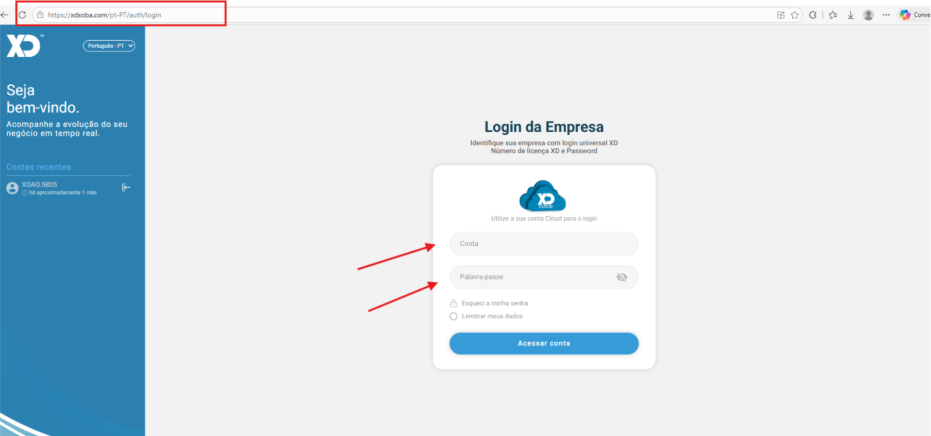
- Access the authentication form in the XD Soba frontend at https://xdsoba.com/ and fill in the access data.
If you already have an account, but the connection is not yet configured, the system will automatically redirect you to the connection registration form, as illustrated in the following image.
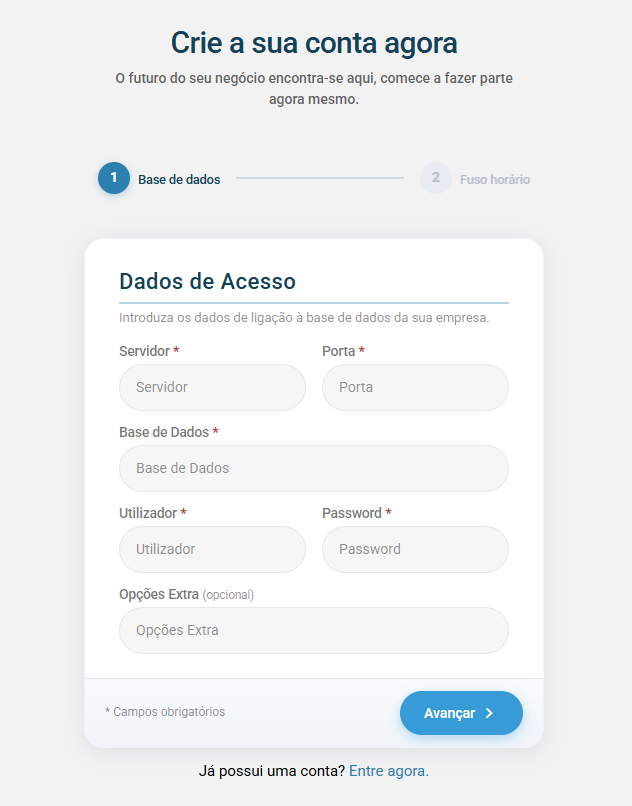
- Fill in the server connection data in the first step of registration:
- Server: MySQL server address (e.g., cloudserverxd0003.ddns.net or server IP)
- Port: MySQL port (usually 3306)
- Database: Name of the specific MySQL database for the tenant XDAO.5805
- User: MySQL username with database access permissions
- Password: MySQL user password
- Extra Options: (optional) Additional connection options if necessary
- Submit the form - The system will:
- Automatically save the connection in the Azure Key Vault with the key XDAO.5805
- Proceed to the next step (timezone configuration)
- After completing the registration, the connection will be configured and the error will no longer occur
- Timezone Configuration - Optional.
The timezone configuration is an optional step that can be performed after the connection configuration or at any later time through the Diversos (Miscellaneous) menu.
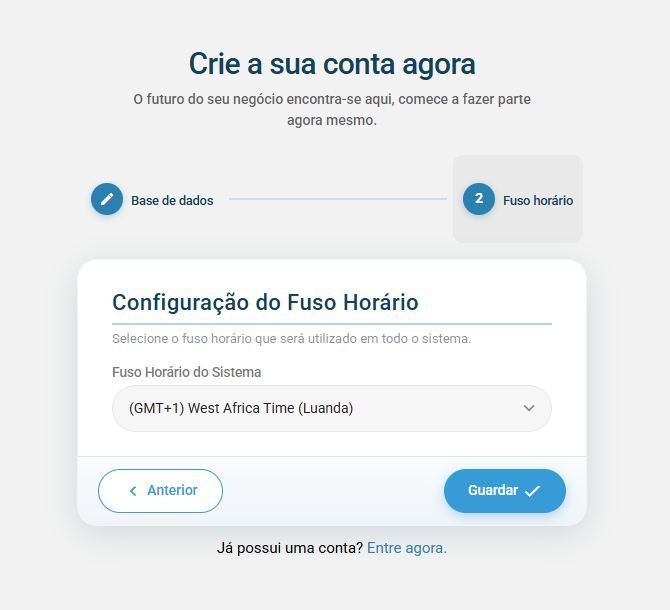
To set your timezone manually, follow these steps:
- Navigate to the Diversos (Miscellaneous) menu.
- Select the Geral (General) option.
- In the top menu of the page, click on Fuso Horário (Timezone).
- Choose the desired timezone from the list and save the change.
To configure the database connection, you need to have on hand:
- MySQL Server: IP address or hostname of the MySQL server
- Port: MySQL access port (default: 3306)
- Database Name: Name of the specific MySQL database for the tenant
- MySQL User: Username with database access permissions
- MySQL Password: User password
Authentication and Token Retrieval
After creating the XD Cloud account, log in to obtain the authentication token that will be used to access the XD Soba endpoints.
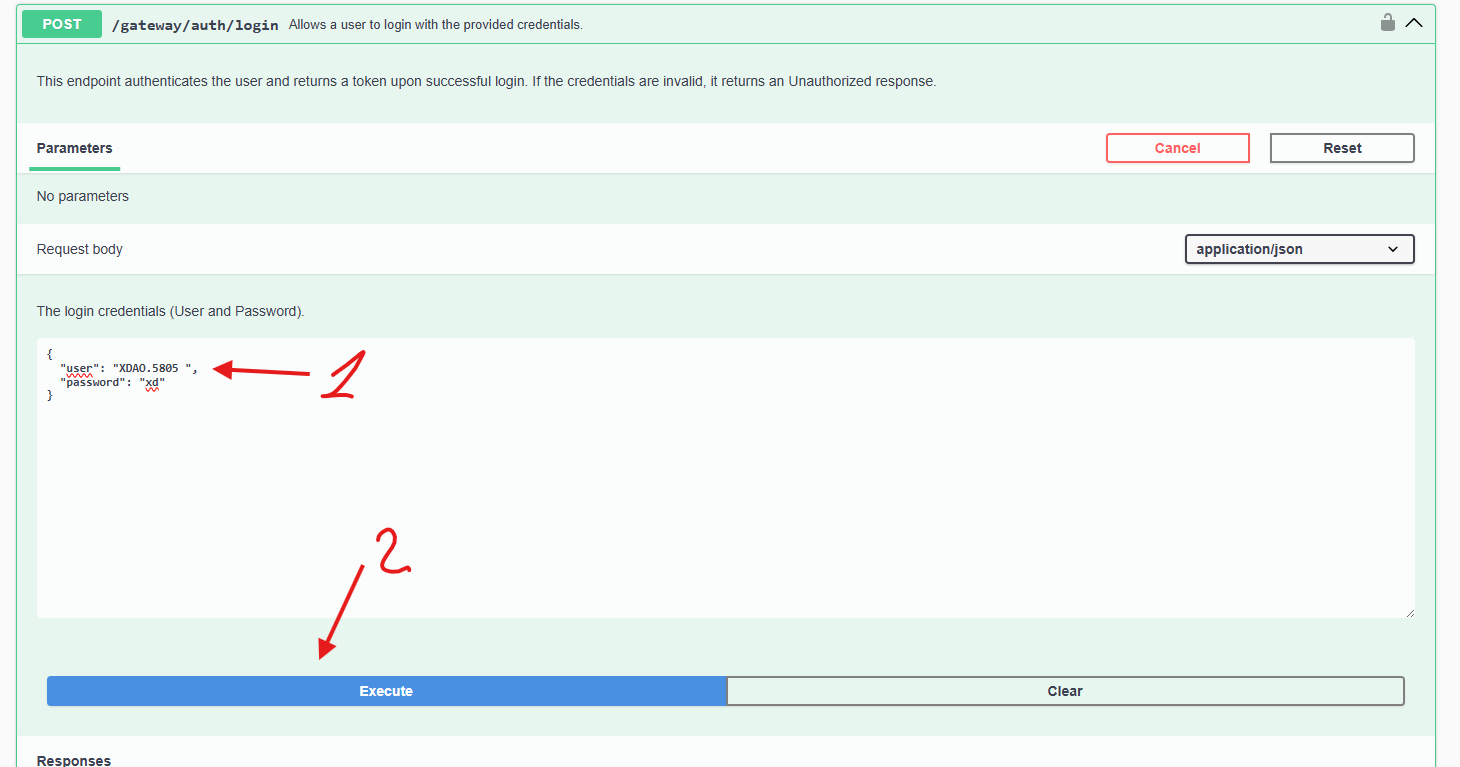
Steps to log in:
- Access the address: https://api.xdsoba.com/swagger
- In the API menu, select the
/gateway/auth/loginendpoint. - Fill in the fields in the request body:
"user": Enter the license (XD Cloud account)."password": Enter your password.
- Click Execute to submit the request.
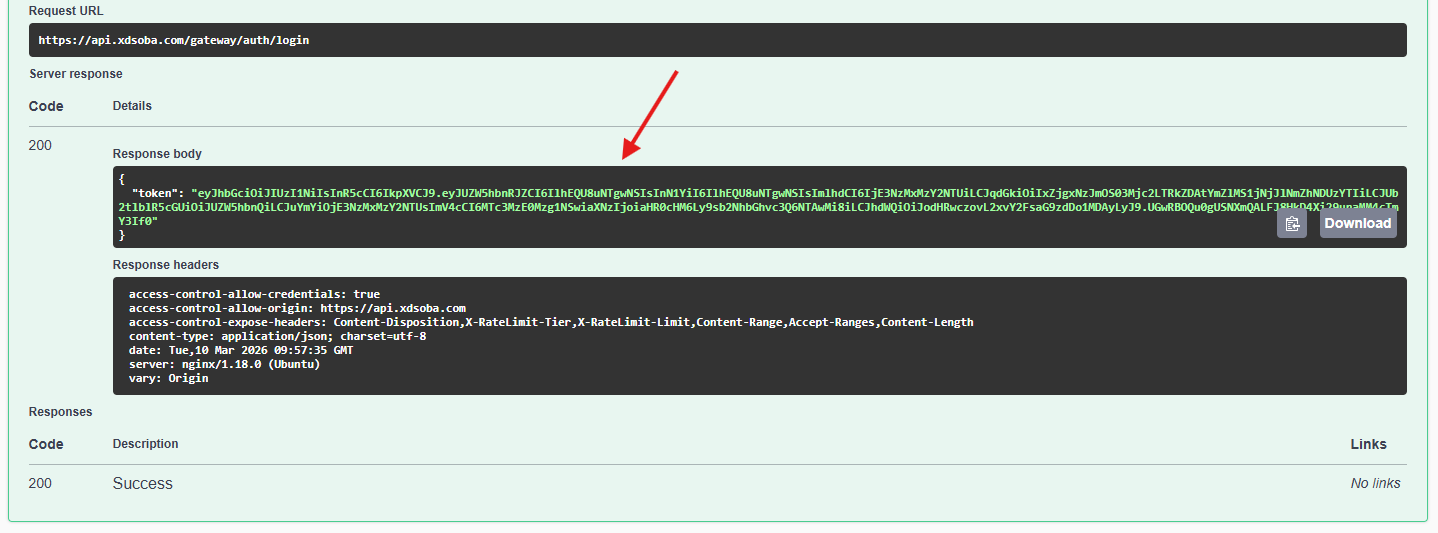
After successfully logging in, you will receive a response with the token.
You must always use your own license and password configured in XD Gestão Comercial.
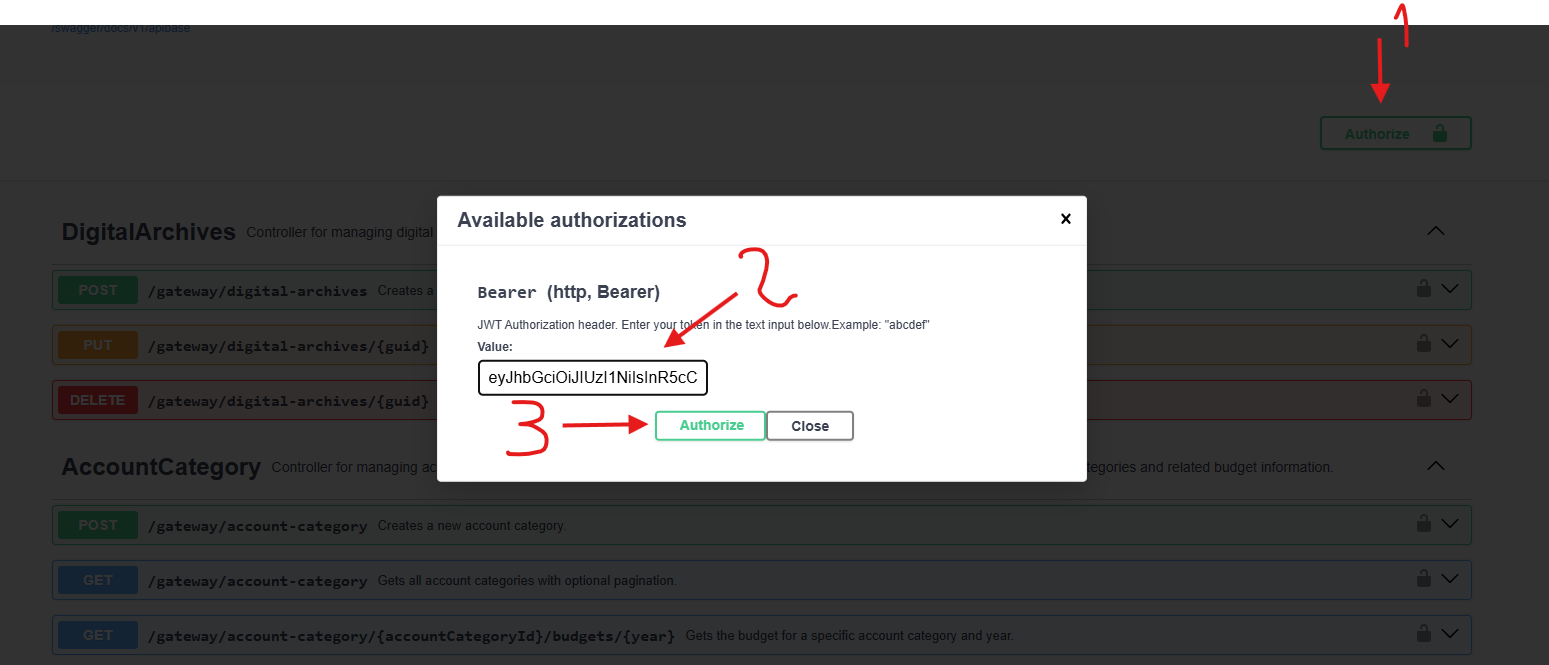
How to Use the Token
In all requests to the API endpoints, you must include the token in the request header:
curl -X GET "https://api.xdsoba.com/gateway/item" \
     -H "Authorization: Bearer eyJhbGciOiJIUzI1NiIsInR5cCI6IkpXVCJ9.eyJzdWIiOiIxMjM0NTY3ODkwIiwibmFtZSI6IkpvaG4gRG9lIiwiYWRtaW4iOnRydWUsImlhdCI6MTUxNjIzOTAyMn0.KMUFsIDTnFmyG3nMiGM6H9FNFUROf3wh7SmqJp-QV30"
Endpoint Usage Examples
After completing all configuration steps (XD Cloud account creation, login, and database access configuration), you can now use the XD Soba endpoints to access the available data and features.
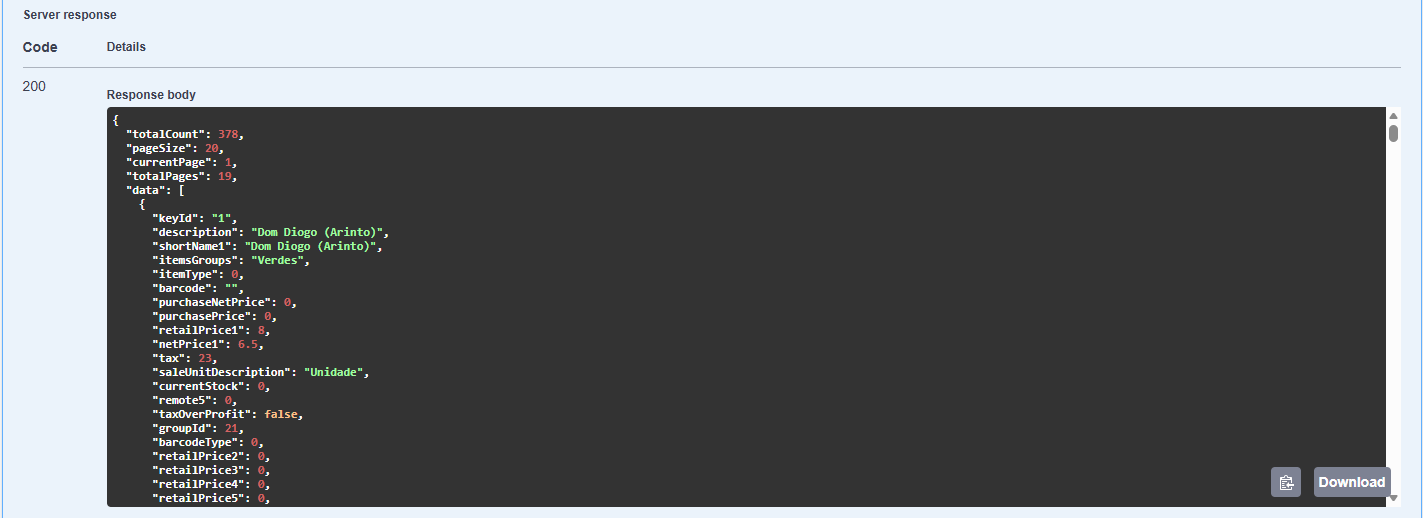
Example 1: Querying Items
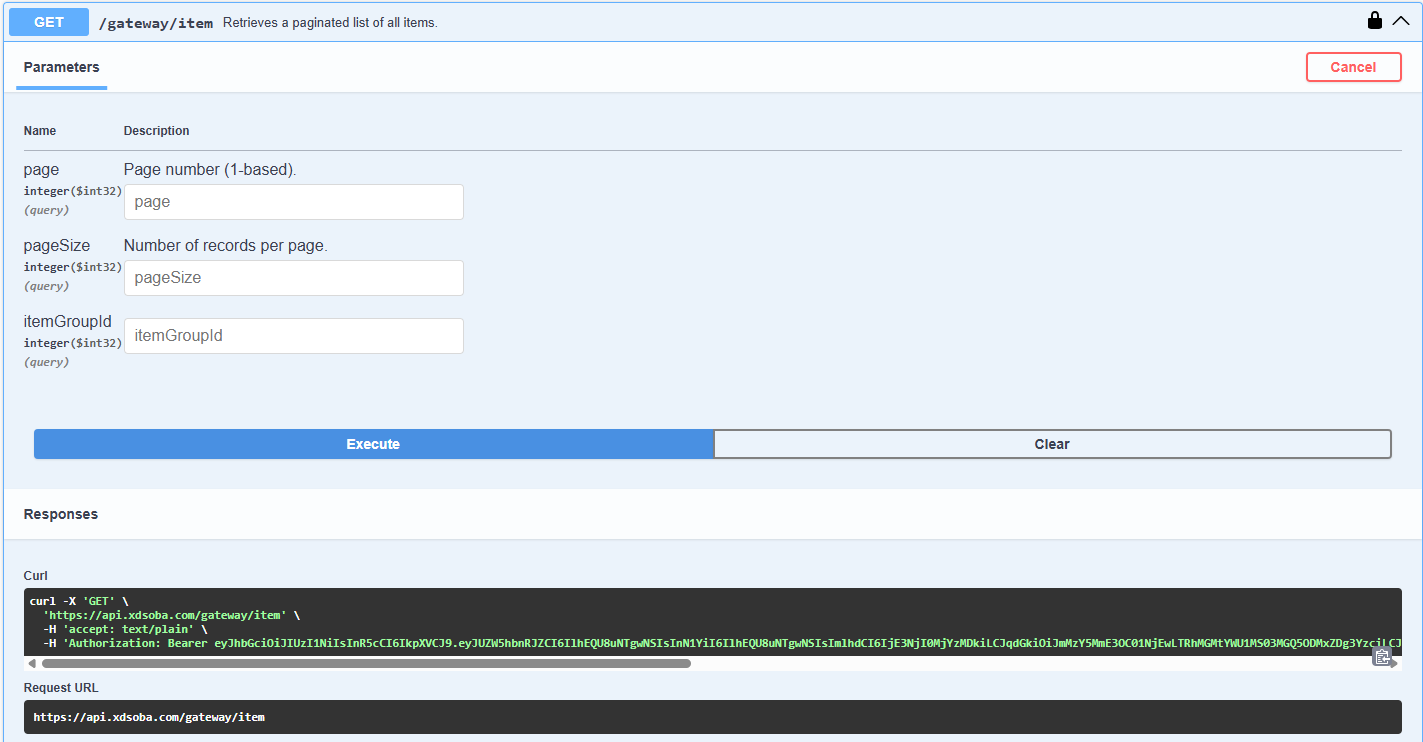
- In Swagger, select the
GET /gateway/itemendpoint. - Fill in the desired parameters (optional):
skip: Number of records to skip (useful for pagination).pageSize: Number of records to return per page.itemGroupId: Filter by family.
- Click Execute to send the request.
If everything is correct (and the authentication token has been placed in the Authorization header), you will receive a response with the list of available items.
Security Observations
- Never share your access data.
- Do not store credentials in shared files.
- In case of doubt, contact XD support.
Authentication
All API requests require authentication using JWT (JSON Web Tokens). To authenticate:
- Send a POST request to
/gateway/auth/loginwith your credentials - Use the returned token in the
Authorizationheader for subsequent requests
curl -X POST "https://api.xdsoba.com/gateway/auth/login" \
     -H "Content-Type: application/json" \
     -d '{"user": "your_user", "password": "your_password"}'
Include the token in your requests:
curl -X GET "https://api.xdsoba.com/gateway/item" \
     -H "Authorization: Bearer your_token_here"
Base URL
All API endpoints are relative to the base URL:
https://api.xdsoba.com/gateway
Common Headers
Include these headers in your requests:
Authorization: Bearer <token>- Required for authenticated endpointsContent-Type: application/json- Required for POST/PUT requestsAccept: application/json- Recommended for all requests
Rate Limiting
To ensure fair usage and system stability, we implement rate limiting:
- 100 requests per minute per API key
- Rate limit headers are included in the responses:
X-RateLimit-Tier: Tier NameX-RateLimit-Limit-PerMinute: Maximum requests per windowX-RateLimit-Window: Time until the rate limit is reset
Error Handling
The API uses standard HTTP status codes and returns error details in the response body:
{
  "status": 404,
  "title": "Not Found",
  "type": "https://tools.ietf.org/html/rfc7231#section-6.5.4",
  "errors": [
    {
      "code": "Item.NotFound",
      "description": "Item not found.",
      "type": 2,
      "furtherInformations": null
    }
  ]
}
Common status codes:
200 OK: Successful request201 Created: Resource successfully created400 Bad Request: Invalid request parameters401 Unauthorized: Invalid or missing authentication403 Forbidden: Insufficient permissions404 Not Found: Resource not found429 Too Many Requests: Rate limit exceeded500 Internal Server Error: Server-side error
Next Steps
Now that you understand the basics, you can:
- Explore the API Reference for detailed endpoint documentation
- Consult the API Usage Guide for best practices and common patterns
- Visit the Troubleshooting Guide if you encounter any issues